Add Video in Background using Ionic 2

While making mobile application using Ionic 2, you wants to make your app more attractive. To make it attractive you need to add some images ,videos that can attract users. So to make application more attractive you can add videos by following the below steps:

Step 1 : Firstly add video folder in app folder by the name videos and save the video in it.

Step 2: For synchronization with www folder you have to add a task in gulp file.

 gulp.task('videos', function(){  
   return gulp.src('app/videos/**/*.+(mp4)')  
     .pipe(gulp.dest('www/build/video'));  
 });  

here gulp.src(‘app/videos/**/*.+(mp4)’) is the source path from where video will be taken and will be sent to the www folder after performing the gulp task.

Step 3: Now add this new task ‘videos‘ in the ‘watchgulp-watch and ‘build‘ gulp-build tasks:

 gulp.task('watch', ['clean'], function(done){  
  runSequence(  
  ['sass', 'html', 'fonts', 'scripts','images','videos'],  
   function(){  
    gulpWatch('app/**/*.scss', function(){  
     gulp.start('sass');  
    });  
    gulpWatch('app/**/*.html', function(){  
     gulp.start('html');  
    });  
    gulpWatch('app/**/*.+(ttc|otf)', function(){ gulp.start('fonts'); });  
    buildBrowserify({  
     src: browserifySrc,  
     watch: true  
    }).on('end', done);  
   }  
  );  
 });  

 gulp.task('build', ['clean'], function(done){  
  runSequence(  
   ['sass', 'html', 'fonts', 'scripts', 'images','videos'],  
   function(){  
    buildBrowserify({  
     src:browserifySrc,  
     minify: isRelease,  
     browserifyOptions: {  
      debug: !isRelease  
     },  
     uglifyOptions: {  
      mangle: false  
     }  
    }).on('end', done);  
   }  
  );  
 });  

Step 4: For display , Ionic 2 code in .html page :

  <video autoplay loop class="video" muted webkit-playsinline requestFullScreen>  
     <source src="build/video/Muted_bg_video.mp4" type='video/mp4' >  
   </video>  

code of .scss for styling :

 .bg-vid {  
      position: absolute;  
      top: 50%;  
      left: 50%;  
      min-width: 100%;  
      min-height: 100%;  
      width: auto;  
      height: 100%;;  
      z-index: -100;  
      -webkit-transform: translateX(-50%) translateY(-50%);  
      -moz-transform: translateX(-50%) translateY(-50%);  
      -ms-transform: translateX(-50%) translateY(-50%);  
      -o-transform: translateX(-50%) translateY(-50%);  
      transform: translateX(-50%) translateY(-50%);  
      background-size: cover;  
 }  

Note : For iPhone this above code will show video player and then after stopping it we will get the screen. To resolve this problem we have to add preferences in the config.xml file :

 <preference name="AllowInlineMediaPlayback" value="true"/>  

and in .html file you have to add the below code which is in bold as iPhone use h.264 encoding scheme:

 <video autoplay loop class="video" muted webkit-playsinline requestFullScreen>  
     <source src="build/video/Muted_bg_video.mp4" type='video/mp4; codecs="h.264"' >  
     <source src="build/video/Muted_bg_video.mp4" type='video/mp4' >  
   </video>  

By following these steps you are done with adding video in background.


Lag in transition while tapping on button in ios

While creating ios application using ionic 2 framework you may notice a certain delay of 300 ms in transition when you click on the button , link or any ion-item which you wants to make clickable . To solve this issue we can use “tappable” attribute in the tags of ion-item .

for ion-icon you can use in the below form:

 <ion-icon name="search" (click)="showsearchbar()" tappable></ion-icon>  

in case of button click you can use tappable as :

 <button (click)="display()" tappable ></button>  

on click event of ion-card you can use as :

 <ion-card *ngFor="let post of posts" (click)="display()" tappable></ion-card>

Add Custom Icons in your Ionic 2 Application

Ionic 2 has its own library  of icons which you can get from Ionicons. But sometime one may want to add custom images as icons in the application. Here is one approach on how to achieve it?

Lets start from scratch. There are a few prerequisites which we will see as we proceed.

Step 1: Create an ionic2 Tab Application using the terminal using the command:

 ionic start customicons tabs --v2 --ts  

A project will be downloaded from github having the initial project structure for a tab based application. It is important to note that there is no direct approach to add custom icons.

After searching found a library that allowed me to manage and add custom icons in the project. The library is called “ionic2-custom-icons“.  To add this library into the project we first need to upgrade the project to Ionic 2 beta 10 (2.0.0-beta.10). This upgrade and its steps are documented in the link ionic2beta10.  After the upgrade is completed we can run the below command to add the ionic2 Custom Icons.

 npm install ionic2-custom-icons --save  

Step 2: Now set your gulp task. Gulp is a powerful toolkit that helps to automate painful or time-consuming build tasks in the development workflow. A gulp task for the library can be created through the following steps:

a. Add the plugin in the gulpfile.js

 var customIcons = require('ionic2-custom-icons/gulp-plugin');  

b. Create a new task and configure the plugin .To do this add a folder named icons in your application and configure the icon sets . You may name your task as you want but it should be same in your whole project. In this example below the name of the task is ‘customicons‘.

 gulp.task('customicons', function () {  
   return customIcons([  
     // config  
     {  
       src: 'icons/MyIcon/*.svg',  
       name: 'MyIcon',  
       id: 'ic'  
     }  
   ])  
 });  

c. Now add this new task ‘customicons‘ in the ‘watchgulp-watch and ‘build‘ gulp-build tasks:

 gulp.task('watch', ['clean'], function(done){  
  runSequence(  
   'customicons', ['sass', 'html', 'fonts', 'scripts'],  
   function(){  
    gulpWatch('app/**/*.scss', function(){ gulp.start('sass'); });  
    gulpWatch('app/**/*.html', function(){ gulp.start('html'); });  
    buildBrowserify({ watch: true }).on('end', done);  
   }  
  );  
 });  
 gulp.task('build', ['clean'], function(done){  
  runSequence(  
  'customicons',  ['sass', 'html', 'fonts', 'scripts'],  
   function(){  
    buildBrowserify({  
     minify: isRelease,  
     browserifyOptions: {  
      debug: !isRelease  
     },  
     uglifyOptions: {  
      mangle: false  
     }  
    }).on('end', done);  
   }  
  );  
 });  

d.  Next add a directory to the ‘sass‘ task gulp-sass. The plugin will generate a sass file for every icon set and these need to be converted into css using a Sass interpreter.

 gulp.task('sass', function () {  
   return buildSass({  
     sassOptions: {  
       includePaths: [  
         // default paths (see ionic-gulp-sass-build)  
         'node_modules/ionic-angular',  
         'node_modules/ionicons/dist/scss',  
         // added for custom icons  
         'node_modules/ionic2-custom-icons/directive/lib/scss/',  
         'www/scss'  
       ]  
     }  
   });  
 });  

Note: By default the project will have a Sass task in the gulpfile. Replace the task with the Sass task shown above.

e. Now import the icon set in app.core.scss as:

 @import "MyIcon"  

Step 3: Now add directives in the template. Directive can be defined in the app.ts file.

 import {Component,PLATFORM_DIRECTIVES} from '@angular/core';  
 import {CUSTOM_ICON_DIRECTIVES} from 'ionic2-custom-icons';  
 ionicBootstrap(MyApp, [  
   {  
     provide: PLATFORM_DIRECTIVES, useValue: [CUSTOM_ICON_DIRECTIVES], multi: true  
   }  
 ]);  

Step 4: Add your custom icon name in customIconName  as shown below in tabs.html page.

 <ion-tabs>  
   <ion-tab customIconSet="ic" customIconName="wine" [root]="tab1Root"></ion-tab>  
   <ion-tab customIconSet="ic" customIconName="calendar"[root]="tab2Root"></ion-tab>  
   <ion-tab customIconSet="ic" customIconName="list"[root]="tab3Root"></ion-tab>  
 </ion-tabs>  

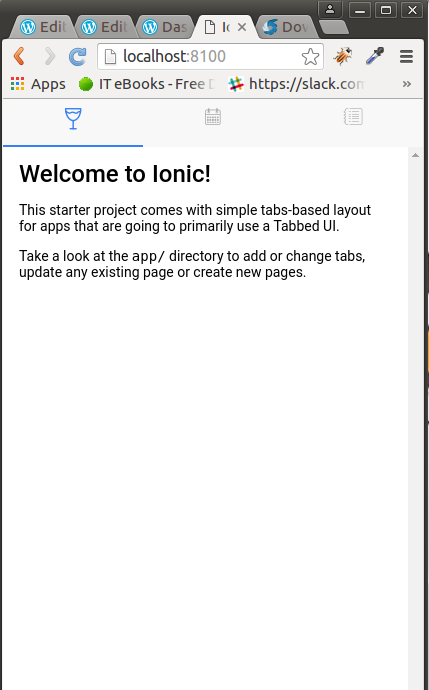
This is all as far as the code changes required for this implementation. Now run the command shown below in your terminal to launch the application with your custom icons:

 ionic serve  

Menu_001
Screen with custom icons 

A project with the details and implementation is available for download from git-hub.

References: https://github.com/GerritErpenstein/ionic2-custom-icons

Removal of white screen after splash screen in Android

Sometimes you will face problem  of white screen display after slash screen while making android application using Angular 2 and Ionic 2 .

To solve this issue you can edit your config.xml file with the following tags:

<preference name=”AutoHideSplashScreen” value=”false”/>
<preference name=”SplashShowOnlyFirstTime” value=”false”/>
<preference name=”FadeSplashScreen” value=”false”/>
<feature name=”SplashScreen”>
<param name=”android-package” value=”org.apache.cordova.splashscreen.SplashScreen”/>
</feature>

After this you have to change your app.ts file by the following code :

constructor(private platform:Platform) {
this.rootPage = TabsPage;

platform.ready().then(() => {

StatusBar.styleDefault();
this.hideSplashScreen();
});

}

And make a function hideSplashScreen() defining the timeout of splash screen.

hideSplashScreen() {

if(Splashscreen) {
setTimeout(()=> {
Splashscreen.hide();
}, 100);
}

}

How to integrate Firebase in your Ionic 2 application.

Firebase is a cloud services provider and backend as a service company based in San Francisco, California. The company makes a number of products for software developers building mobile or web applications. Firebase’s primary product is a realtime database which provides an API that allows developers to store and sync data across multiple clients. The company was acquired by Google in October 2014.
Step 1: Create ionic project using command :

 ionic start firebaseIntegration blank --v2 –ts  

(Here “firebaseIntegration” is the project name “blank” is the type of application which you wants to create “v2” version 2 of ionic and “ts” is the typescript )
Step 2: Check if your application is working using the command

 ionic serve  

Step 3: Install AngularFire2 and Firebase using the command

 npm install angularfire2 firebase --save  

Step 4: After this run the command

 sudo typings install --save es6-promise  

(es6-promise typings is installed. It is a lightweight library that provides tools for organizing asynchronous code)
Step 5 : Now create a project in firebase using the url :

 https://console.firebase.google.com  

Step 6: We have created a project in firebase as firebaseIntegration using steps
a. Login into firebase using your mail id.
b. Go to the console tab.
c. Click on CREATE NEW PROJECT tab as shown in figure.

Screenshot from 2016-07-15 14-17-10
Console of Firebase

d. A window will appear as shown in figure . Give your project name and your country name.

Screenshot from 2016-07-15 14-17-39
Create Project

e. A window will appear as shown in the figure .Click on the link Add Firebase to your web app.

Screenshot from 2016-07-15 15-44-00
Selecting type of project

f. A screen will appear after this showing all the credentials which you have to write in your code. “apikey”, “authdomain” ,”databaseURL”.

Screenshot from 2016-07-15 14-18-44
Firebase Database Credentials

g. Click on the Database in the side panel. Create sub child in the format as shown in the figure.

Screenshot from 2016-07-15 14-36-16
Adding Data into Firebase Database

Step 7: Go into the code of the application.
a. In home.html page write the code

 <ion-navbar *navbar>  
  <ion-title>  
   Ionic Firebase  
  </ion-title>  
 </ion-navbar>  
 <ion-content class="home" padding>  
  <ul>  
   <li *ngFor="let item of items | async">  
    {{ item.name }}  
   </li>  
  </ul>  
 </ion-content>  

b. In home.ts page write the code

 import {Component} from "@angular/core";  
 import {NavController} from 'ionic-angular';  
 import {AngularFire, FirebaseListObservable} from 'angularfire2';  
 import {Observable} from 'rxjs/Observable';  
 @Component({  
  templateUrl: 'build/pages/home/home.html'  
 })  
 export class HomePage {  
  items: FirebaseListObservable<any[]>;  
  constructor(private navController: NavController, af: AngularFire) {  
   this.items = af.database.list('https://fir-integration-208bb.firebaseio.com/items');  
  }  
 }  
 </ion-content>  

c. In app.ts page add the providers of firebase.

 providers: [FIREBASE_PROVIDERS,  
        defaultFirebase({  
         apiKey: "AIzaSyBAyk1liaHkvDfaYJ6icSI3QiHbsnrx9d4",  
         authDomain: "fir-integration-208bb.firebaseapp.com",  
         databaseURL: "https://fir-integration-208bb.firebaseio.com",  
         storageBucket: "fir-integration-208bb.appspot.com",  
  })]  

And add library for firebase :

import {FIREBASE_PROVIDERS, defaultFirebase, AngularFire} from 'angularfire2';

Step 8: Now run the application by using the command ionic serve.

Step 9: You will see errors in the terminal of “Cannot find namespace ‘firebase’ ”. To resolve this problem add

/// <reference path="../node_modules/angularfire2/firebase3.d.ts" />

in typings/main.d.ts file.
Step 10 : To read data from firebase go to the tab of rules and give the permission of read as shown in figure:

Rules defination
Rules defined for read and write

Output:

Screenshot from 2016-07-15 16-19-15


Website Powered by WordPress.com.

Up ↑