How do modifications in node-modules package code??

Are you in a situation where you have to change code in node-module package? Sometimes you have some code snippet you want to change in node module package code but its not advisable to do that because when you install any other package the changes done in package will revert back t original. And in some situations node-modules work after making build of that package so in any case its not correct to change anything in node-modules package.

So how to change code in node-module package ?? Can we do it??

Yes, we can do it. By following below steps:

  1. Fork the package from GitHub or clone the required package my-package from GitHub.
  2. When it get cloned in your local system run command to install the required dependencies yarn install.(using yarn for package installation)
  3. Then run command yarn build. This will make build which can created after making required changes in the dependencies.
  4. Now we have to link our project with this dependency. So now how to link our project with our dependency my-package?

For this we have to install yalc package globally into our system using the command yarn global add yalc. Why we are using this package, as linking functionality is available in both npm and yarn . Because if these are used, it throws Invalid Hook Warning. That’s why yalc package is required. Commands and setup for yalc are below:

  1. Run yalc publish in your dependency package my-package. This will create build and make my-package available for linking. It will copy all the files that should be published in remote NPM.
  2. Run yalc add my-package in your dependent project, which will copy the current version from the store to your project’s .yalc  folder and inject a file: .yalc/my-package dependency into package.json.
  3. With yarn start application can be started.

Now every time if some changes are done in my-package then we have to run yalc publish in dependency and to get the latest code lined to our project , we have to run yalc add my-package.

A After that my-package can be pushed to GitHub and can be included in the package.json file. Or directly make the build by yarn run build and then you can host the application even without pushing my-package to GitHub.
How to write Graphql nested mutation in React.js

Graphql now a days is coming in boom, as it is faster than others communication APIs and don’t have over fetching or under fetching issues. But with the ease of advantages of Graphql sometimes we face issues while writing the queries and mutation for the Graphql. With query we can write FETCH request and with mutation we can write other 3(PUT, POST,DELETE) request. For simple queries and mutation https://www.apollographql.com/docs/tutorial/queries/ is the perfect tutorial, but when we have to write complex or nested mutation how do we write it?

Lets take an example, If we want to pass a complex object to Graphql like below:

{
    name:"",                               //STRING
    description:"",                     //STRING
    department:"",                   //STRING
    category:[],                         //Array
    manufacturer:"",                //STRING
    files:[]                                //Array of File
properties:[{                         //Array of Objects
        name:"",                        //STRING
        toggle:"",                      //Boolean
        values:[                          //Array of Objects
                {
                    name:"",               //String
                    status:"",              //Boolean
                    image:""              //File
                }
            ]
        }     
    ]
}


In above block we have nested array of objects, how we should write mutation for this nested object?? Below code is written in assumption that apollo-client, apollo-client provider, queries and mutation setup is already done in the project.

export const ADD_PRODUCT_MUTATION = gql`
mutation addProductMutation(
  $name: String!
  $description: String!
  $category: [String!]
  $manufacturer:String!
  $department:String!
  $files:[Upload!]!
  $property:[propertyInput!]!
) {
  addProduct(name: $name, description: $description, category:$category, manufacturer:$manufacturer, department:$department,files:$files, property:$property)
}`;

Here the propertyInput is the whole properties object we have defined in first block of code. We don’t have to write separate mutation or any nested mutation for content existing in properties (Array of Objects), just we have to keep in mind that the function names and the attributes name should be same as the names in backend code.

How to remove the tags coming from backend

Handling with the JSON data in the applications  sometimes we face issues of HTML tags coming from back-end . So how to resolve this issue?

We can resolve by using regular expression and javascript function like replace. Below is the snippet for this issue.

if (this.state.content!= undefined) {
// checked whether it exists or not.
var regex = /(<([^>]+)>)/gi
//regular expression
var des =this.state.content
var res = des.replace(”, ”)
var res = des.replace(regex, ”)
//will replace the tags with blank
}

Now you can use res variable in the render function directly in the render function.

React-Native: How to Integrate API in different Situations

Hello guys, while integrating API in react-native we usually face many problems, like fetching the data from API and work with that data on same page, some times we need to show the list of items in List-view, and sometimes we need to pass the object from the render function into the functions which you are calling outside the render function.

Lets’ start with the easy one, in which we just have to show the data coming from API into the page where you don’t have any type of looping, like just wants to display the description of single item.

Before going into the coding, hope you are clear with the concepts of state and props.

We use state to store the data your current page needs in your controller-view, and we use props to pass data & event handlers down to your child components.

As the uses define we need to store the data on our current page so we will use the state.

Example:

import React ,{Component} from 'react';  
 import {  
  View,  
  Text  
 } from 'react-native';  
 import axios from 'axios';  
 export default class classname extends Component{  
   state={  
   customerDetail:[] 
  }  
  componentDidMount() {  
  axios.get('API')  
  .then(response => this.setState({  
   customerDetail : response.data,  
  }))  
  .catch(function(err) {  
    return err;  
   });  
  }  
  render() {  
   console.log(this.state.customerDetail) //this will display the response of API 
    return (  
     <View>  
        <Text>{this.state.customerDetail.name}</Text>  
     </View>  
    )  
 }  

The above code will fetch the dictionary and will store it in customerDetail state and we can call its objects with dot (.) operator as done the above code and that  can be used in the render function.

For the other two situations I will continue in other blog.


Camera Implementation using Animation

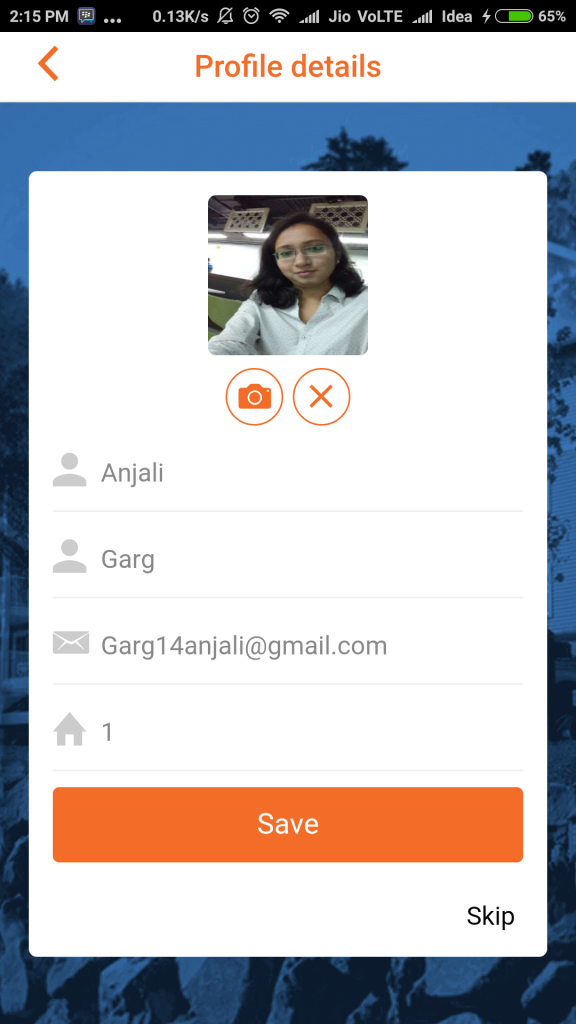
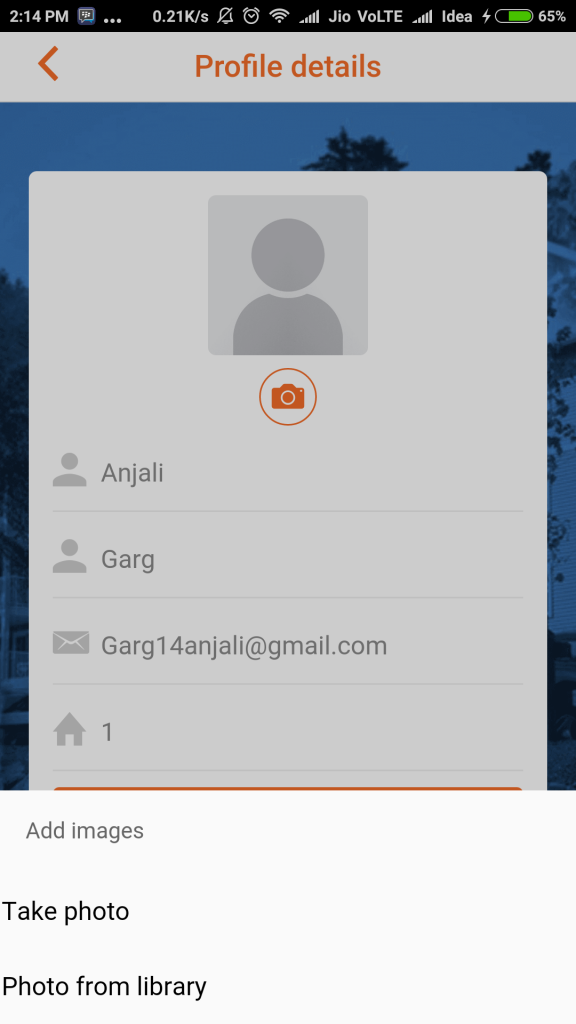
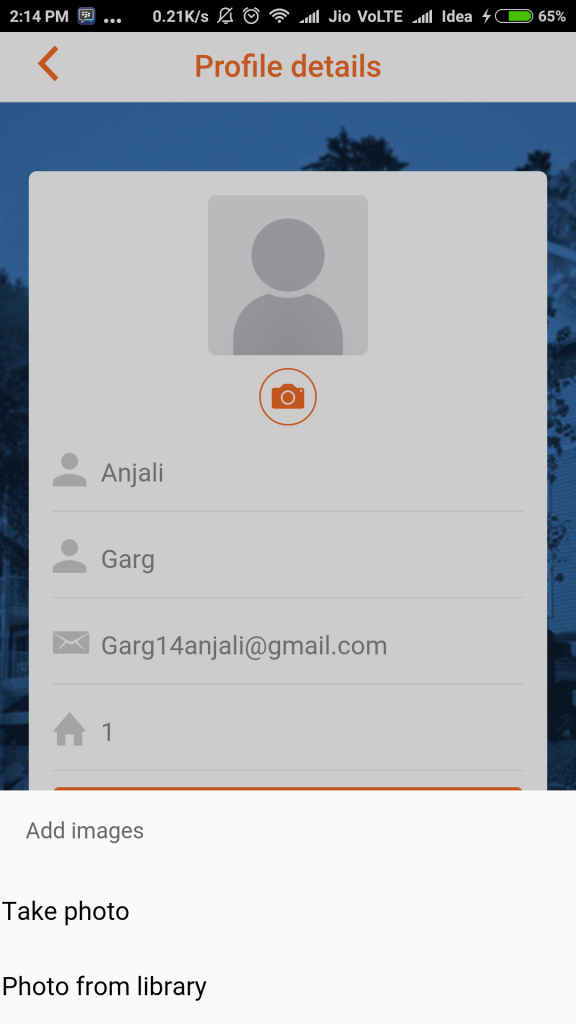
We faced a situation where we have to add profile image in a form .The camera should able to capture image from camera and  can upload from gallery.Below you will find the solution for this and some animation is added for its look and feel.

screenshot_2016-10-17-14-14-54-392_com-hl-mushroom-panoramatowers
Option to capture image from camera or from gallery

In Html the below code:

selection_011

In .js file

 $scope.signUpImage = function () {  
   $scope.hideSheet = $ionicActionSheet.show({  
     buttons: [  
       {text: 'Take photo'},  
       {text: 'Photo from library'}  
     ],  
     titleText: 'Add images',  
     cancelText: 'Cancel',  
     buttonClicked: function (index) {  
       $scope.addImage(index);  
     }  
   });  
 };  
 $scope.addImage = function (type) {  
   $scope.hideSheet();  
   saveMedia(type);  
 };  
 function saveMedia(type) {  
   $cordovaCamera.getPicture(optionsForCordovaCamera(type)).then(  
     function (imageData) {  
       $scope.temp_image = "data:image/png;base64," + imageData;  
       image_data = imageData;  
     }  
   );  
 };  
 function optionsForCordovaCamera(type) {  
   var source;  
   switch (type) {  
     case 0:  
       source = Camera.PictureSourceType.CAMERA;  
       break;  
     case 1:  
       source = Camera.PictureSourceType.PHOTOLIBRARY;  
       break;  
   }  
   return {  
     quality: 60,  
     destinationType: Camera.DestinationType.DATA_URL,  
     sourceType: source,  
     allowEdit: true,  
     popoverOptions: CameraPopoverOptions,  
     saveToPhotoAlbum: false,  
     targetWidth: 300,  
     targetHeight: 300  
   };  
 };  

Below code is for close button.

 $scope.closeImage = function () {  
   $scope.temp_image = null;  
 }  

In scss for creating custom animation you can use below code.But for the by default animation you can follow the link:ng-animate

 .my-animation.ng-enter {  
  /* standard transition code */  
  transition: 2s linear all;  
  opacity: 0;  
 }  
 .my-animation.ng-enter-stagger {  
  /* this will have a 100ms delay between each successive leave animation */  
  transition-delay: 0.8s;  
  /* As of 1.4.4, this must always be set: it signals ngAnimate  
   to not accidentally inherit a delay property from another CSS class */  
  transition-duration: 1s;  
 }  
 .my-animation.ng-enter.ng-enter-active {  
  /* standard transition styles */  
  opacity: 1;  
 }  
 .fade.ng-leave {  
  animation: my_fade_animation 0.5s linear;  
  -webkit-animation: my_fade_animation 0.5s linear;  
 }  
 @keyframes my_fade_animation {  
  from {  
   -webkit-transform: translate3d(0px, 0, 0);  
   transform: translate3d(0px, 0, 0);  
  }  
  to {  
   opacity: 0;  
   -webkit-transform: translate3d(-10px, 0, 0);  
   transform: translate3d(-10px, 0, 0);  
  }  
 }  
 @-webkit-keyframes my_fade_animation {  
  from {  
   -webkit-transform: translate3d(0px, 0, 0);  
   transform: translate3d(0px, 0, 0);  
  }  
  to {  
   opacity: 0;  
   -webkit-transform: translate3d(-10px, 0, 0);  
   transform: translate3d(-10px, 0, 0);  
  }  
 }  
 .camera_size {  
  color: $theme_color;  
  font-size: 25px;  
 }  
 .margin_bottom {  
  margin-bottom: 1px;  
 }  
 .icon_border {  
  border-radius: 50%;  
  padding-top: 5px;  
  width: 36px;  
  height: 36px;  
  margin: 2px 1px;  
  border: 1px solid $theme_color;  
  display: inline-block;  
 }  
 .img_profile {  
  border-radius: 5px;  
  width: 100px;  
  height: 100px;  
 }  

After applying scss

screenshot_2016-10-17-14-15-15-226_com-hl-mushroom-panoramatowers
After  selection of image from gallery 

How to make ad hoc ipa build for iphone

Working with ionic we need to make both ios and android build. Android build can be made by executing few commands and it is bit easier than making ad hoc build for ios. So below are the steps to make ios  ad hoc build.

Step 1: Through terminal first go into your project e.g. /app_folder

Step 2: Check your branch from terminal using the command git branch

Step 3: Add bundle id and version of application in config.xml.

Step 4: Add splash screen and icon in resources folder. Icon should be of size 192*192 pixels, and the  splash screen should be of size 2208*2208 pixels.

Step 5: Now from the terminal run the following commands:

  • ionic resources
  • Ionic state restore
  • Ionic build ios

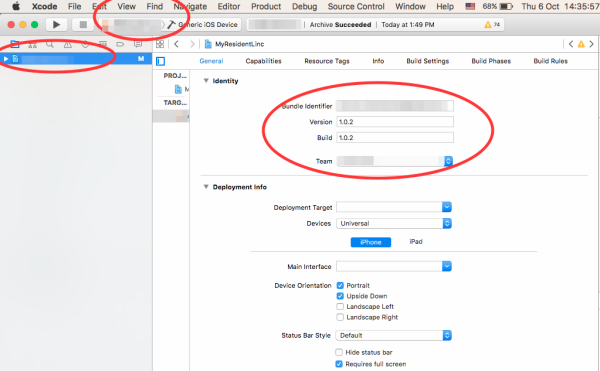
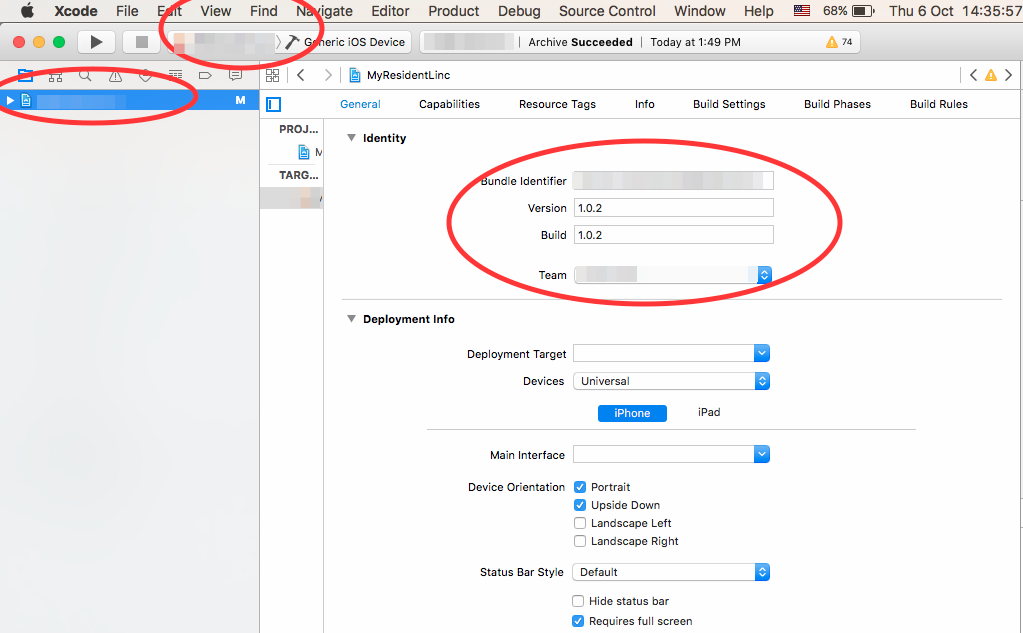
Step 6:Your build is ready now. Now you have to open your project into xcode. Using finder go to the path /app_folder/platforms/ios/myapp.xcodeproj. By double clicking on the myapp.xcodeproj your xcode will be opened.

Step 7: In xcode your app will be opened as shown in the above screenshot. Check your project name, bundle id and version of your application as highlighted in the screenshot.

screen-shot-2016-10-06-at-2-35-47-pm

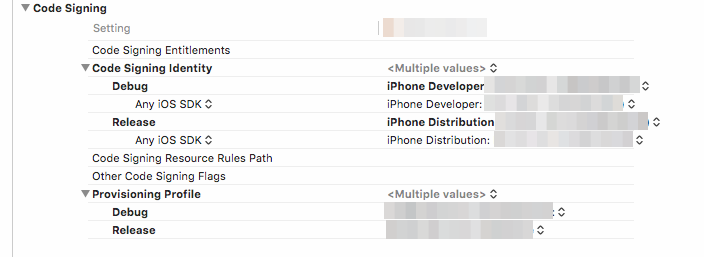
Step 8: Now go to the Build Settings tab and open the  provisioning profile under Code Signing.screen-shot-2016-10-06-at-2-52-54-pm

Check the Debug and Release options. Select respective certificate like below screen.

Step 9: Now from the title bar select the product->clean and after the completion of clean select product->archive. After that an organizer window will appear.

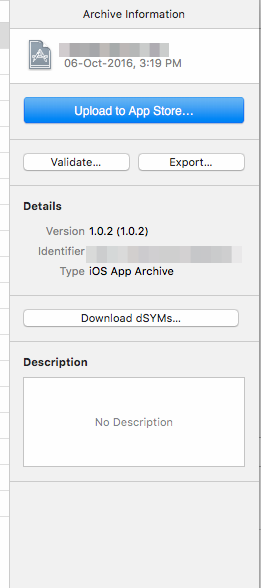
Step 10: Now click on the Export button.

screen-shot-2016-10-06-at-3-19-27-pm

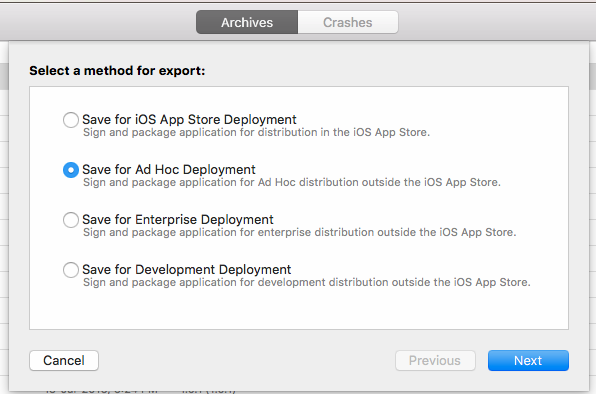
Step 11: After this you will have the following screen. For adhoc build select the shown option:

screen-shot-2016-10-06-at-3-19-40-pm

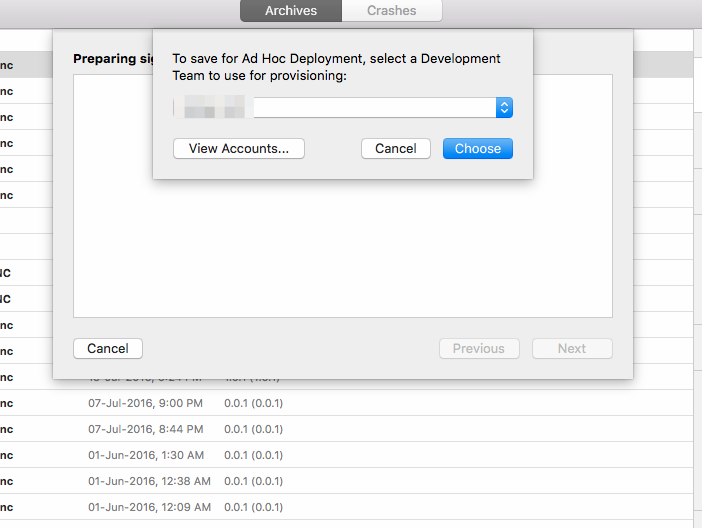
Step 12: Now click “Next” from above screen. You will get following screen.Select your user/owner account like above screen and click “Choose” Button.

screen-shot-2016-10-06-at-3-20-01-pm

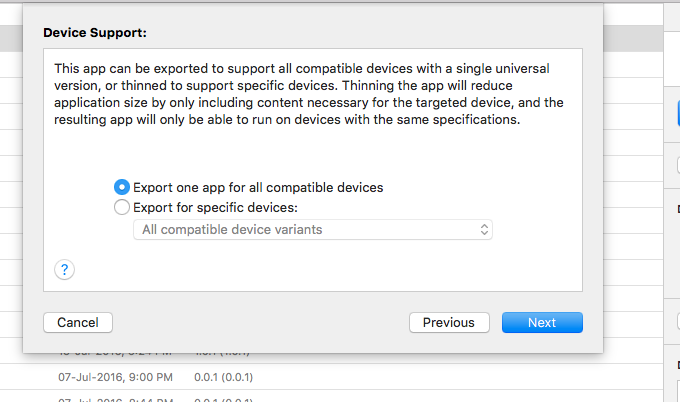
Step 13: You will get following screen. Be sure “Export one app for all compatible devices” option is selected. Now click “Next” Button.You will get following screen.

screen-shot-2016-10-06-at-3-20-19-pm

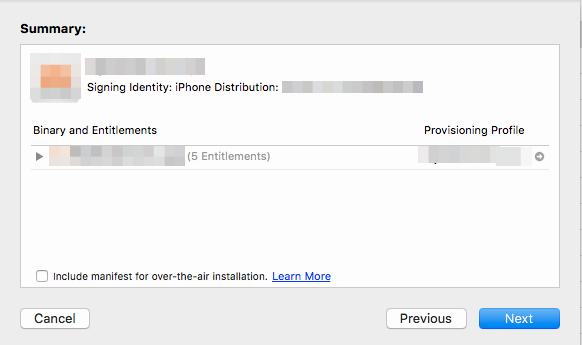
Step 14: A summary window will open as shown below. Now click “Next” Button.

screen-shot-2016-10-06-at-3-20-29-pm

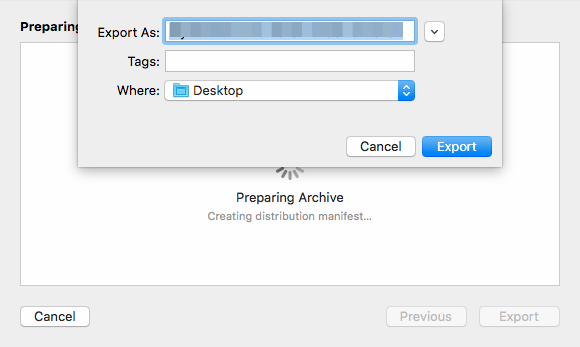
Step 15: You will get following screen.You can change your name and path. Now click “Export” button.You will get your ipa under the Desktop->your_given_name->your_app_name.ipa .

screen-shot-2016-10-06-at-3-20-41-pm

How to pass object from one page to another in Angular JS (Basics)

We always have basic requirement to pass object from one page to another in our application in Ionic 1. To do so follow the below steps:

Step 1: Create an application using the command:

 ionic start passobject blank   

Step 2: Define states in app.js file . In this demo application 2 states are created.

myapp.config(function ($stateProvider, $urlRouterProvider) {
 $stateProvider
  
    .state('mainPage', {  
     url: '/mainPage',  
     templateUrl: 'views/main.html',  
     controller: 'namesCtrl'  
    })  
    .state('listPage', {  
     url: '/listPage',  
     templateUrl: 'views/list.html',  
     controller: 'namesCtrl',
      params: {objectName: null}               ////////////params additional parameter added
    })  
   $urlRouterProvider.otherwise('/mainPage');  ////////////to make Home Screen
  });  

In listPage  state  an additional parameter is added params which will handle the object and initialized as null.

Step 3: Make controller.js file in js folder of www in application with the code:

 myapp.controller('namesCtrl', function ($scope, $state, $stateParams) {  
   $scope.details = $stateParams.objectName; 
   $scope.chats = [  
     { name: 'Jani', country: 'Norway', url: '/img/ionic.png' },  
     { name: 'Hege', country: 'Sweden', url: '/img/ionic.png' },  
     { name: 'Kai', country: 'Denmark', url: '/img/ionic.png' }  
   ];  
   $scope.chatDetail = function (data) {  
     $state.go('listPage', { objectName: data });  
   }  
 });  

In chatDetail function data is passed as object  and inside this function $state.go is used to change state with which we pass object as param.

Step 4: Now make the html pages for main page and list page.

main.html

<ion-view view-title="Chats">  
  <ion-content>  
   <ion-list>  
    <ion-item ng-repeat="chat in chats">  
     <a ng-click="chatDetail(chat)">  
      <h2>{{chat.name}}</h2>  
     </a>  
    </ion-item>  
   </ion-list>  
  </ion-content>  
 </ion-view>  

list.html

 <ion-view view-title="{{details.name}}">  
   <ion-content class="padding">  
     <h2>{{details.name}}</h2>  
     <img ng-src="{{details.url}}" style="width: 64px; height: 64px">  
     <p> {{details.country}}</p>  
   </ion-content>  
 </ion-view>  

Here the details contains the selected item detail from the mainPage state .


Ionic 1: Sliding Tabs Implementation

Today in almost every application we have sliding tabs e.g. Facebook , Paytm. So for implementing sliding tabs we can use Sliding Box.

Add tabSlideBox.scss with the following code in your application .

 .tabbed-slidebox .slider {  
   height: 100%;  
 }  
 .tabbed-slidebox.btm .slider {  
   margin-bottom: -50px;  
 }  
 .tabbed-slidebox .slider-slides {  
   width: 100%;  
 }  
 .tabbed-slidebox .slider-slide {  
   padding-top: 0px;  
   color: #000;  
   background-color: #fff;  
   text-align: center;  
   font-weight: 300;  
   background-color: #0398dc;  
 }  
 .tabbed-slidebox .tsb-icons {  
   text-align: center;  
   margin: 10px 0;  
   position: relative;  
      background-color:#fff;  
 }  
 .tabbed-slidebox .tsb-ic-wrp {  
   display: flex;  
   position: relative;  
      -webkit-transition: -webkit-transform 0.3s; /* For Safari 3.1 to 6.0 */  
      -webkit-transform:translate3d(0,0,0);  
 }  
 .tabbed-slidebox .tsb-icons a {  
   display: inline-block;  
   width: 54px;  
   font-size: 2.5em;  
   color: rgba(0, 0, 0, 0.3);  
      -webkit-transform:translate3d(0,8px,0);  
 }  
 .tabbed-slidebox .tsb-icons a.active {  
   color: rgba(0, 0, 0, 1);  
   font-size: 3.5em;  
      -webkit-transform:translate3d(0,0,0);  
 }  
 .tabbed-slidebox .tabbed-slidebox {  
   position: relative;  
   height: 100%;  
   overflow: hidden;  
 }  
 .tabbed-slidebox .tsb-icons:after {  
   width: 0;  
   height: 0;  
   border-style: solid;  
   border-width: 0 1.4em 1.4em 1.4em;  
   border-color: transparent transparent #0398dc transparent;  
   position: absolute;  
   content: "";  
   display: block;  
   bottom: -12px;  
   left: 50%;  
   margin-left: -14px;  
 }  
 .tsb-hscroll.scroll-view{  
       white-space: nowrap;  
      margin:0 auto;  
 }  
 .tsb-hscroll.scroll-view .scroll-bar{  
      visibility:hidden;  
 }  
 .tsb-hscroll.scroll-view .scroll.onscroll{  
      -webkit-transition: -webkit-transform 0.3s; /* For Safari 3.1 to 6.0 */  
 }  
 .tabbed-slidebox .tsb-icons .scroll a{  
      width:auto;  
      font-size: 1.5em;  
      line-height: 1.5em;  
      text-decoration: none;  
      margin: 0 15px;  
      border-bottom: 3px solid transparent;  
 }  
 .tabbed-slidebox .tsb-icons .scroll a.active {  
      font-size: 1.8em;  
      border-bottom: 3px solid #ccc;  
 }  

And tabSlideBox.js  in your lib folder and include it into your index.html under libraries section in side the script tag. tabSlideBox.js attached file tabslider

Include  tabSlideBox  as a module for your app

 var app = angular.module('slidebox', ['ionic', 'tabSlideBox']);  

The Ionic Code to implement the scroll-able tabs  using ng-repeat is as follows:

Here by default middle tab will be selected. To make another tab active you should take a variable tab and set it accordingly.

  <ion-view title="Scrollable Tabbed Slide box">  
     <ion-content scroll="false">  
           <tab-slide-box id="sibling_id" tab="0">  
                       
</div> <ion-slide-box show-pager="false" on-slide-changed="slideHasChanged($index)"> <ion-slide> <h3>Home content</h3> </ion-slide> <ion-slide> <h3>Games content</h3> </ion-slide> <ion-slide> <h3>Mail content</h3> </ion-slide> </ion-slide-box> </tab-slide-box> </ion-content> </ion-view>

The code for the controller:

 app.controller("IndexCtrl", [ "$scope",function($scope){   
            $scope.tabs = ['Home', 'Games', 'Mail'];   
           }   
  ]);   

Reference:https://market.ionic.io/plugins/tabbedslidebox

Ionic 2: Sharing Things on Social Media

From your application sometimes you need to share your blog post url, message or website url on social sites like Facebook, Twitter or wants to share with your friends on Whats app, Gmail.

You can do this by using Apache Cordova plugin in your Ionic 2 Application. Follow the below steps to achieve this.

Step 1: Setup your Ionic 2 application using the below commands :

 ionic start social-media blank --v2 --ts  
 cd social-media  
 ionic platform add android  ///// for android  
 ionic platform add ios     ///// for ios  

Step 2: Install SocialSharing-PhoneGap plugin using the command:

 ionic plugin add cordova-plugin-x-socialsharing  

You are done with the project setup. Now you can start your coding.

Step 3: Open your application in any of the editor (Webstorm, Atom, Visual Code) . You will see a home folder inside the app folder. In home folder you will see three files home.html, home.scss and home.ts.

Step 4: In home.html , write the below code:

 <ion-header>  
  <ion-navbar>  
   <ion-title>  
    Home  
   </ion-title>  
  </ion-navbar>  
 </ion-header>  
 <ion-content class="home">  
   <button full (click)="share('Hello World', 'Attention', null, 'https://anjaligargsite.wordpress.com/2016/08/27/how-to-install-two-versions-on-system')">Share</button>  
   <button full (click)="shareViaEmail('Hello World', null, 'garg14anjali@gmail.com')">Share on Mail</button>  
   <button full (click)="shareViaFacebook('Hello World', null, 'https://anjaligargsite.wordpress.com/2016/08/27/how-to-install-two-versions-on-system')">Share on Facebook</button>  
   <button full (click)="shareViaWhatsApp('Hello World', null, 'https://anjaligargsite.wordpress.com/2016/08/27/how-to-install-two-versions-on-system')">Share on Whatsapp</button>  
 </ion-content>  

The output of this page will be:

Screenshot_2016-09-03-12-28-58-930_com.ionicframework.socialmedia760768
Home Page

Step 5: In home.ts ,write the below code:

 import { Component } from '@angular/core';  
 import { NavController, Platform} from 'ionic-angular';  
 import { SocialSharing } from 'ionic-native';  
 @Component({  
   templateUrl: 'build/pages/home/home.html'  
 })  
 export class HomePage {  
   constructor(private platform: Platform) {  
     this.platform = platform;  
   }  
   share(message, subject, file, link) {  
     this.platform.ready().then(() => {  
       SocialSharing.share(message, subject, file, link);  
     });  
   }  
   shareViaEmail(message, image, link) {  
     this.platform.ready().then(() => {  
       SocialSharing.canShareViaEmail().then(() => {  
         SocialSharing.shareViaEmail(message, image, link);  
       }, (err) => {  
         console.error(err);  
       });  
     });  
   }  
   shareViaFacebook(message, image, url) {  
     this.platform.ready().then(() => {  
       SocialSharing.shareViaFacebook(message, image, url);  
     });  
   }  
   shareViaWhatsApp(message, image, url) {  
     this.platform.ready().then(() => {  
       SocialSharing.shareViaWhatsApp(message, image, url);  
     });  
   }  
 }  

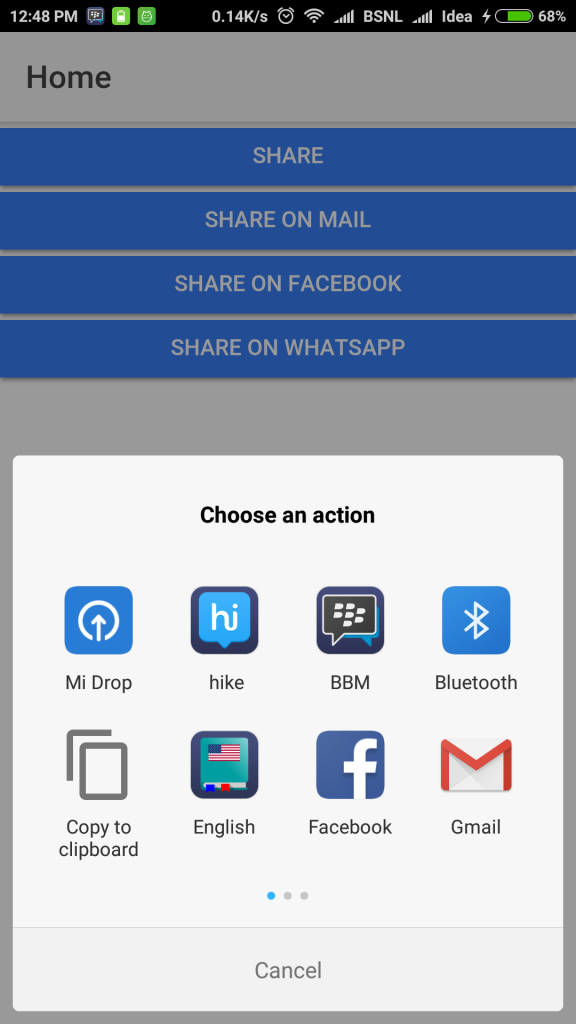
Here the share function will allow you to share your message using any application installed in your mobile.The output will be as below:

Screenshot_2016-09-03-12-48-58-350_android
Output using Share function

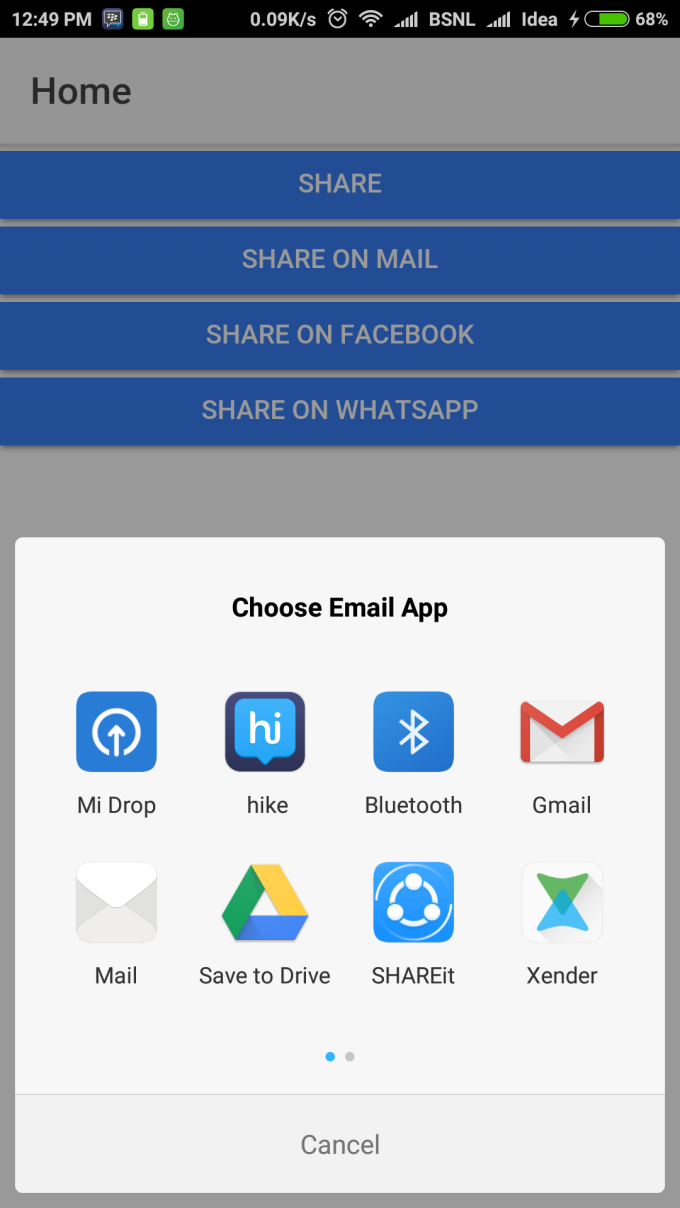
The shareviaEmail function will allow you to share your message using mailing application installed in your mobile.The output will be as below:

Screenshot_2016-09-03-12-49-13-915_android
Output using shareviaEmail function

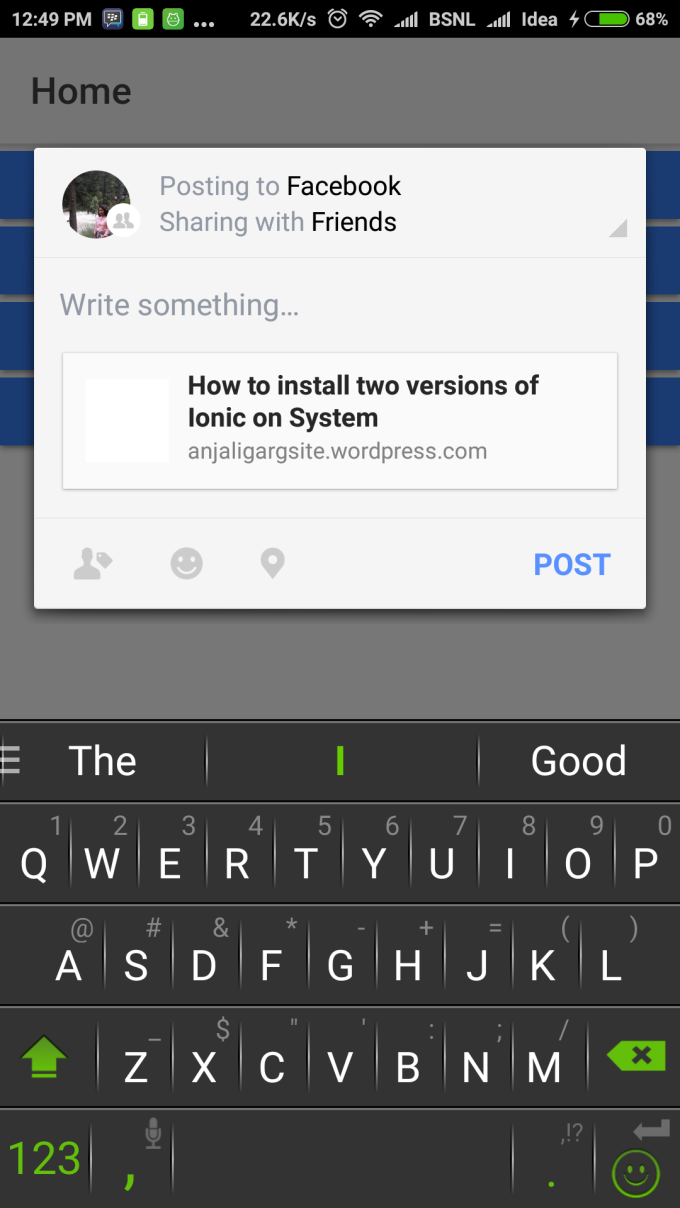
the shareviaFacebook function will allow you to share your blog url using facebook application installed in your mobile.The output will be as below:

Screenshot_2016-09-03-12-49-26-923_com.facebook.katana
Output using shareviaFacebook function

the shareviaWhatsApp function will allow you to share your blog url using whatsApp application installed in your mobile.The output will be as below:

Screenshot_2016-09-03-11-08-09-265_com.whatsapp
Output using shareviaWhatsApp function

Similarly you can share your message or urls using Twitter , Instagram, Sms and etc.

Reference :Social Sharing

You can download the demo application using the git hub link : https://github.com/anjali14garg/social-sharing

How to install two versions of Ionic on System

Switching the installation of Ionic from version Ionic 1 to Ionic 2 is very time consuming work.

We have some projects made using Ionic 1 and some using Ionic 2. Installing again and again ionic versions create problems.Using nvm (node version manager)it became very easy to perform this switching.

Firstly  open terminal and create ionic 1 and ionic 2 applications using the commands:

 ionic start helloionic1 blank             //////////for ionic 1
 ionic start helloionic2 blank --v2 --ts  ////////// for ionic 2

Then go into the application and create file with name .nvmrc in both the application . Check the versions of nvm using the below command in terminal:

 nvm ls-remote  

This command will give you the list of nvm versions available. Select  nvm versions which you wants for your applications. Lets take an example , for ionic 1 select the nvm v5.0.0   and for ionic 2 nvm v6.4.0.

Mention the nvm versions in both the .nvmrc files respectively of applications.Then through terminal install the selected versions of nvm in the applications using the command:

 nvm install v5.0.0   ///////for ionic 1
 nvm install v6.4.0   ////// for ionic 2

After completion of the installation check the version of npm by using the below command as with nvm, npm is installed automatically :

 npm -v  

But before this execute the command nvm use in terminal so that npm can use the nvm. In both the application the version of npm should be different.

After this we are almost done just have to install ionic1 and ionic2 in the applications helloionic1 and helloionic2 respectively using the commands:

 npm install -g ionic@1.7.15   ////////for ionic 1  
 npm install -g ionic @beta   //////// for ionic 2  

Now you can run both ionic versions on your system in different applications

 Commands for ionic 1  
 ionic start helloionic1 blank  
 cd helloionic1  
 nvm install v5.0.0  
 nvm use  
 npm -v  
 npm install -g ionic@1.7.15  
Commands for ionic 2  
 ionic start helloionic2 blank --v2 --ts  
 cd helloionic2  
 nvm install v6.4.0  
 nvm use  
 npm -v  
 npm install -g ionic@6.4.0 

Note: This will be applicable if you are already having nvm and any version of ionic in your system, if not then see below steps

Step 1: Install nvm using the below command:

 curl -o- https://raw.githubusercontent.com/creationix/nvm/v0.31.6/install.sh | bash  

This will install the the nvm in your system.

Step 2: Then create 2 folders one for ionic1 and other for ionic2.

Step 3: Create .nvmrc files in both the folder and write the text 5.0.0 and 6.4.0 in ionic1 and ionic2 folders respectively as we get these versions of nvm by using the command:

 nvm ls-remote 

Step 4:  After this install nvm versions using the below commands and check the version of the nvm using the command nvm -v it will be different for both :

 nvm install v5.0.0   ///////for ionic 1
 nvm install v6.4.0   ////// for ionic 2

Step 5: Now execute the nvm use command and install the ionic 1 and ionic 2 frameworks in respective folders using the commands:

 npm install -g ionic@1.7.15   ////////for ionic 1  
 npm install -g ionic @beta   //////// for ionic 2  

Step 6: Now the last step is to create applications of ionic1 and ionic2 frameworks in respective folders using the command:

 ionic start helloionic1 blank             //////////for ionic 1
 ionic start helloionic2 blank --v2 --ts  ////////// for ionic 2

Now you can go into the application and can run the application using the command ionic serve.

Summary

 curl -o- https://raw.githubusercontent.com/creationix/nvm/v0.31.6/install.sh | bash  ////nvm install
 nvm ls-remote 
 For ionic 1
 cd ionic1
 nvm use
 nvm install v5.0.0
 npm install -g ionic@1.7.15 
 ionic start helloionic1 blank
 cd helloionic1
 ionic serve

For ionic 2
 cd ionic2
 nvm use
 nvm install v6.4.0
 npm install -g ionic@beta
 ionic start helloionic2 blank --v2 --ts 
 cd helloionic2
 ionic serve
 

Website Powered by WordPress.com.

Up ↑